테크 지식
[커뮤니티] 아마도 쉬운 안드로이드 어플만들기 [31] 그리기 객체

퍼갈 때에는 반드시 저작자의 허락과 저작자의 이름(아이디)를 기록하어야 합니다.
저작자는 Snails(tjdtnsu)입니다.
제발 덧글 좀 적어주세요. 강의 적는 시간은 1시간이지만 덧글은 1분도 걸리지 않습니다.
참고 : 이 강좌는 초보자를 위한 Eclipse를 사용하였습니다.
올리는 곳 : 제 네이버 블로그, 디벨로이드 카페, App Development 카페, 프그머 카페
업로드 시간 : 매주 일요일 오후 11시
난이도 : ★★★★
이번 시간에는 그리기 객체를 이용해서 뭔가를 그려보겠습니다.
오늘은 3가지를 다뤄 볼 텐데 그 세가지는 비트맵, 텍스트, 패스가 있습니다.
일단 코드와 실행 사진을 보여드리겠습니다.
package naver.maybeeasyandroidprogramming; import android.app.Activity;import android.content.Context;import android.content.res.Resources;import android.graphics.Bitmap;import android.graphics.Canvas;import android.graphics.Color;import android.graphics.Paint;import android.graphics.Path;import android.graphics.Rect;import android.graphics.drawable.BitmapDrawable;import android.os.Bundle;import android.view.Display;import android.view.Menu;import android.view.View;import android.view.WindowManager; public class MainActivity extends Activity { int width; int height; @SuppressWarnings("deprecation") @Override protected void onCreate(Bundle savedInstanceState) { super.onCreate(savedInstanceState); MyView test = new MyView(this); Display display = ((WindowManager)getSystemService(WINDOW_SERVICE)).getDefaultDisplay(); width=display.getWidth(); height=display.getHeight(); setContentView(test); } protected class MyView extends View { public MyView(Context context) { super(context); } public void onDraw(Canvas canvas) { super.onDraw(canvas); Path path = new Path(); Paint p=new Paint(); Resources res = getResources(); BitmapDrawable bd = (BitmapDrawable)res.getDrawable(R.drawable.nofile); Bitmap bit = bd.getBitmap(); canvas.drawBitmap(bit, 10,10,null); canvas.drawBitmap(bit, null, new Rect(0,500,width,700),null); String ws = String.valueOf(width); String hs = String.valueOf(height); p.setColor(Color.RED); p.setTextSize(20); p.setTextAlign(Paint.Align.LEFT); canvas.drawText(ws,100,200,p); p.setColor(Color.BLUE); p.setTextAlign(Paint.Align.CENTER); p.setAntiAlias(true); canvas.drawText(hs,100,230,p); p.setColor(Color.BLACK); p.setStrokeWidth(7); p.setStyle(Paint.Style.STROKE); path.addCircle(50,300,40,Path.Direction.CW); path.addRect(100,280,150,330,Path.Direction.CW); path.moveTo(180,300); path.lineTo(190,320); path.rLineTo(50,20); path.cubicTo(240,340,260,380,300,300); canvas.drawPath(path, p); } } @Override public boolean onCreateOptionsMenu(Menu menu) { // Inflate the menu; this adds items to the action bar if it is present. getMenuInflater().inflate(R.menu.main, menu); return true; } } |
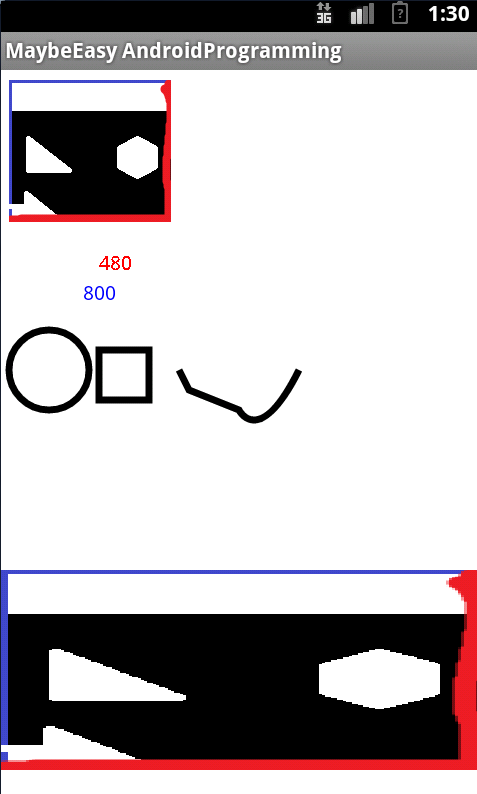
일단 비트맵 설명드리겠습니다.
Resources res = getResources(); BitmapDrawable bd = (BitmapDrawable)res.getDrawable(R.drawable.nofile); Bitmap bit = bd.getBitmap(); canvas.drawBitmap(bit, 10,10,null); canvas.drawBitmap(bit, null, new Rect(0,500,width,700),null);일단 리소스를 가져와서 비트맵을 다음과 같이 정렬시킵니다.
위에는 (10,10)에서 원본 크기에 그립니다.
그 다음에는 (0,500)에서 (width,700)까지 그립니다.
참고로 width는 위에서 정의한 변수입니다.
Display display = ((WindowManager)getSystemService(WINDOW_SERVICE)).getDefaultDisplay(); width=display.getWidth(); height=display.getHeight();
위는 windowmanager를 이용해 디바이스의 폭과 너비를 구하는 겁니다.
그 다음에는 텍스트입니다.
String ws = String.valueOf(width); String hs = String.valueOf(height); p.setColor(Color.RED); p.setTextSize(20); p.setTextAlign(Paint.Align.LEFT); canvas.drawText(ws,100,200,p); p.setColor(Color.BLUE); p.setTextAlign(Paint.Align.CENTER); p.setAntiAlias(true); canvas.drawText(hs,100,230,p);
위에는 빨간색에 왼쪽정렬, (100,200)에 나타나고
아래것은 파란색에 알리아싱을 적용하고 가운데 정렬에 (100,230)을 나타내는 겁니다.
텍스트는 직접 입력하거나 string 형태로 하기 때문에 int형에서 바꾸었습니다.
마지막으로 패스입니다. 약간 어렵긴 합니다.
p.setColor(Color.BLACK); p.setStrokeWidth(7); p.setStyle(Paint.Style.STROKE); path.addCircle(50,300,40,Path.Direction.CW); path.addRect(100,280,150,330,Path.Direction.CW); path.moveTo(180,300); path.lineTo(190,320); path.rLineTo(50,20); path.cubicTo(240,340,260,380,300,300); canvas.drawPath(path, p);
일단 검정색 폭 7로 출발합니다.
일단 원을 그리고 그 옆에 사각형을 그립니다.
그리고 직접 따는 방법이 있는데
180,300->190,320->240,340으로 직선으로 연결 되는데타원형으로 또 그리는것은 너무 복잡해 생략하겠습니다.
다음 시간에는 그라이던트를 하겠습니다.